From Vibe Coding to Production: My React Native/Expo Journey (Or: How I Learned to Stop Worrying and Love the React Native Bundle)
A tale of triumph, tears, and temporary file cleanup
The Beginning: “How Hard Could It Be?”
Picture this: You’ve got an amazing app idea, Claude by your side, and an unshakeable belief that mobile development is just web development with smaller screens. You fire up a new Expo project with the confidence of someone who’s never had to debug why their audio won’t play in silent mode.
Spoiler alert: I was about to learn some very expensive lessons.
This is the story of building my second React Native/Expo app (the first one… well, let’s just say it’s still in “learning experience” purgatory). What started as enthusiastic vibe coding turned into a comprehensive education in mobile development reality.
Phase 1: The Honeymoon Period 🍯
Everything starts beautifully. You run npx create-expo-app and BAM! You’ve got a working app. The simulator is humming, hot reload is magical, and you’re convinced you’re basically the next mobile development prodigy.
✅ Created new Expo app
✅ First screen renders
✅ Navigation works
✅ "This is easy!" - Famous last words
Then you decide to add some fancy features. Maybe some Google Cloud services? Some audio playback? File management? How hard could it be?
Narrator: It was very hard.
Phase 2: The Reality Check 📚
The Great Import Disaster of 2024
My first real wake-up call came when I tried to use Google Cloud Text-to-Speech. Being a seasoned web developer, I naturally reached for the official client library:
// What I tried to do:
import { TextToSpeechClient } from '@google-cloud/text-to-speech';

// What React Native bundler thought of this:
💥 ERROR: Unable to resolve module fs
💥 ERROR: Unable to resolve module path
💥 ERROR: Unable to resolve module crypto
The Lesson: React Native isn’t Node.js wearing a disguise. It’s its own beautiful, frustrating ecosystem with its own rules.
The Solution That Actually Works
// The grown-up way:
const response = await fetch(
  `https://texttospeech.googleapis.com/v1/text:synthesize?key=${apiKey}`,
  {
    method: 'POST',
    headers: { 'Content-Type': 'application/json' },
    body: JSON.stringify(ttsRequest)
  }
);
REST APIs became my new best friend. Sometimes the old-school approach is the right approach.
Phase 3: The Platform Peculiarities 📱
Android Package Name Shenanigans
I learned the hard way that Android has strong opinions about package naming:
❌ app.my-awesome-ai-audio-creator  // Hyphens? Nope!
✅ app.myawesomeaiaudiocreator      // Much better
Apparently, Android build systems have the same naming conventions as that one friend who insists on using underscores_for_everything.
The Silent Audio Mystery
Nothing quite prepares you for the moment when your audio works perfectly in development but goes completely silent on actual devices. The culprit? iOS’s silent mode and Android’s audio ducking.
// The magic incantation:
await Audio.setAudioModeAsync({
  allowsRecordingIOS: false,
  staysActiveInBackground: true,
  playsInSilentModeIOS: true,        // 🎯 This one!
  shouldDuckAndroid: true,           // 🎯 And this one!
  playThroughEarpieceAndroid: false,
});
Phase 4: The Dependency Dance 💃
Version Compatibility Chaos
Expo has this wonderful feature where everything needs to be exactly the right version. Mix Expo SDK 52 with SDK 53 packages? Enjoy your build errors!
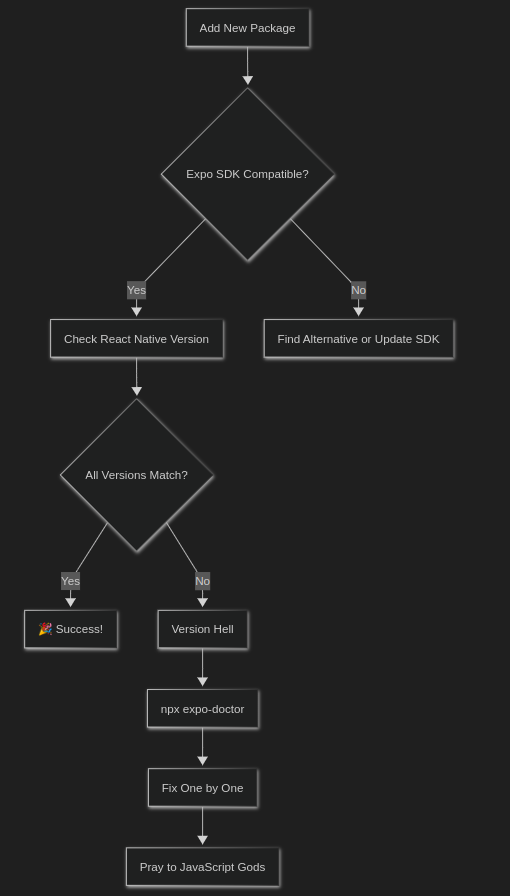
Pro tip: npx expo-doctor became my most-used command. It’s like having a therapist for your dependencies.
Phase 5: The File System Adventures 📁
Dynamic Imports: A Love Story Gone Wrong
I thought I was being clever with dynamic imports:
// My "clever" approach:
const { FileSystem } = await import('expo-file-system');

// What actually happened:
🚫 Race conditions
🚫 Undefined references
🚫 Late-night debugging sessions
The lesson? Sometimes boring static imports are boring for good reasons:
// The boring but working way:
import * as FileSystem from 'expo-file-system';
Temporary File Management: The Storage Hog
Turns out, when you’re generating audio files and processing media, temporary files accumulate faster than dishes in a college dorm. My app went from svelte to storage-hungry monster in record time.
Phase 6: The UI/UX Reality Check 🎨
The Great Dropdown Disaster
Web brain: “Let’s put all 50 voice options in a dropdown!”
Mobile reality: “How about we make your users scroll through a tiny menu for 5 minutes?”
The solution? Card-based galleries and full-screen selection modals. Because mobile users deserve better than squinting at dropdown menus.
ScrollView Inception
Nothing says “beginner React Native developer” like nesting ScrollViews and wondering why your app is having an existential crisis.
ScrollView Warning: VirtualizedLists should never be nested
inside plain ScrollViews...
Thanks, React Native. Very helpful. Very clear. 😅
The Rules That Saved My Sanity 📋
Through trial, error, and more error, I developed what I call “The React Native Survival Guide.” Here are the highlights:
The Holy Trinity of Mobile Development
- Compatibility First – Check
react-native-community/directorybefore adding ANY package - Mobile-First Thinking – Your app isn’t a website. Design for thumbs, not mice.
- Error Resilience – Everything will break. Plan for it.
The Critical Success Patterns
// Always do this:
✅ Use expo install instead of npm install
✅ Match ALL Expo packages to same SDK version
✅ Implement proper cleanup for temporary files
✅ Test on actual devices, not just simulators
✅ Use REST APIs over Node.js client libraries

// Never do this:
❌ Mix different Expo SDK versions
❌ Use hyphens in Android package names
❌ Forget to configure audio sessions for mobile
❌ Assume Node.js libraries work in React Native
❌ Skip error boundaries
The Infrastructure That Actually Works 🏗️
After much trial and error, here’s the tech stack that actually delivered:
📱 Frontend: React Native + Expo SDK 53
🎨 UI: React Native Elements + Custom Components
🔊 Audio: expo-av with proper session management
📂 Storage: expo-file-system + AsyncStorage
🎯 State: Zustand with persistence
🔧 Build: EAS Build with proper profiles
🚀 API: REST-first approach for all external services
Lessons Learned (The Hard Way) 🎓
1. Embrace the Platform Constraints
Mobile development isn’t web development with training wheels. It’s a different beast with different rules. Fighting the platform leads to pain. Working with it leads to better apps.
2. The Power of Progressive Implementation
Don’t try to build everything at once. My successful approach:
- Phase 1: Core functionality with mocks
- Phase 2: Real API integration
- Phase 3: Polish and optimization
- Phase 4: Platform-specific enhancements
3. Documentation Is Your Future Self’s Best Friend
That CLAUDE.md file became my project’s bible. Every weird workaround, every compatibility issue, every “why did we do it this way” moment – documented and searchable.
4. Error Handling Isn’t Optional
In web development, you can get away with optimistic error handling. In mobile, your app lives or dies by how gracefully it handles the unexpected.
The Moments of Pure Joy ✨
Despite all the challenges, there were magical moments:
- The first successful build that actually installed on a real device
- Audio playing perfectly across different phones and OS versions
- File operations working smoothly without crashing or filling up storage
- The app passing review and appearing in the store
These moments make all the debugging sessions worth it.
What I’d Tell My Past Self 💬
Dear Past Me,
- Read the React Native compatibility docs BEFORE adding packages, not after
- Set up proper error boundaries from day one
- Test on real devices early and often
- Don’t fight the platform – embrace its quirks
- REST APIs are often better than fancy client libraries
npx expo-doctoris your friend- Temporary file cleanup isn’t optional
- Audio session configuration matters more than you think
Sincerely,
Future You (who finally shipped the app)
The Results 📊
After implementing all these hard-learned lessons:
- ✅ Build times: From “why won’t this work?” to consistent, predictable builds
- ✅ Performance: Smooth audio playback across devices
- ✅ Stability: Error boundaries catching issues before users see them
- ✅ User experience: Intuitive mobile-first design patterns
- ✅ Maintenance: Clear documentation making updates manageable
Conclusion: The Vibe Coding Vindication 🎉
Here’s the beautiful irony: all this structured learning and rule-following actually made vibe coding BETTER. With a solid foundation of mobile development principles, I could experiment and iterate with confidence.
The rules didn’t kill creativity – they freed it by providing guardrails that prevented falling off the cliff.
The final truth: React Native development is like learning to drive. At first, every small task requires intense concentration. But once you internalize the rules of the road, you can focus on where you’re going instead of how to avoid crashing.
My app is now in production, handling real users with real devices, and (mostly) not breaking. The temporary files are cleaned up, the audio plays in silent mode, and the Android package name has no hyphens.
And you know what? I’m already planning the next one. Because now I know the rules, and rules are meant to help you build amazing things.
Want to skip some of these painful lessons? Check out my React Native Implementation Rules – a comprehensive guide to avoiding the pitfalls I discovered the hard way.
What mobile development lessons have you learned the hard way? Share your war stories in the comments!
P.S. – Yes, I’m still finding temporary files I forgot to clean up. The cleanup struggle is real. 🗂️
If you want to see the resultant code, comment below & I’m sure I can let you take a sneak peek.